Paper Crafts Supplies

Monday, July 31, 2017

DIY UPCYCLING TINS

I'm so happy and excited about my new classroom. I'm a Afrikaans Second Language teacher at a primary school in Middelburg, South Africa.

The year started out with me teaching in a tent under a tree. This alone was an experience. From mud, rain,wind blowing me and the learners away, very hot and sweaty conditions and even a scorpion one day in the tent. This is Africa for you!

Six months down the road and we have a new school building, I have a classroom made of brick and that is  brand new.  
The fun and creative part of teaching can start now!
This means I can start decorating my classroom. Yeah! Happy times!

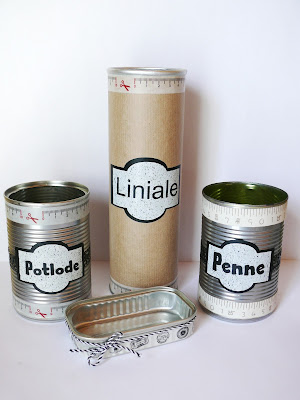
Some of the few things I made is stationary organisers for everything that the learners leave behind in class.
Upcycling stationary organiser, DIY, tins, washi tape, brown paper, labels, vinyl, classroom, Eccentric Eclectic Studio, Yana Fourie, Blogger

Upcycling Stationary Organiser


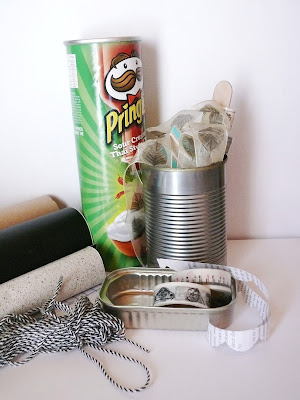
I made use of all the stuff that I had around in my house. I reuse some empty tins and a Pringle container. The rest of the materials were washi tape, brown paper, twine, beautiful ribbon and vinyl.

I made labels from black vinyl and a cutoff piece of vinyl that you use for lining your cabinets. 
Cutting is very easy if you do have a cutting machine. I used my Silhouette Cameo for this purpose. But you can make labels from paper, stickers or anything that comes to mind.

Upcycling stationary organiser, DIY, tins, washi tape, brown paper, labels, vinyl, classroom, Eccentric Eclectic Studio, Yana Fourie, Blogger

Materials used to upcycle tins

I covered the Pringle container with brown paper.  The tuna tin I just made use of washi tape and twine to cover it. The other organisers for the pens and pencils I use washi tape and ribbon.
Like always I have to make use of my glue gun. Most things I stick together using it. What is a crafter without a glue gun!

Starting out I thought I'm going use more embellishments and decorations. Simplicity got the upper hand. I didn't go overboard. Sometimes you just need to know when to stop.

This reuse and decorating of tins went so much quicker that I thought. I'm happy with the end results and think this will make my classroom just that little  bit more personal.

Upcycling stationary organiser, DIY, tins, washi tape, brown paper, labels, vinyl, classroom, Eccentric Eclectic Studio, Yana Fourie, Blogger

DIY Stationary Organisers

Look out for future posts for ideas and decoration of my classroom. 

Friday, July 21, 2017

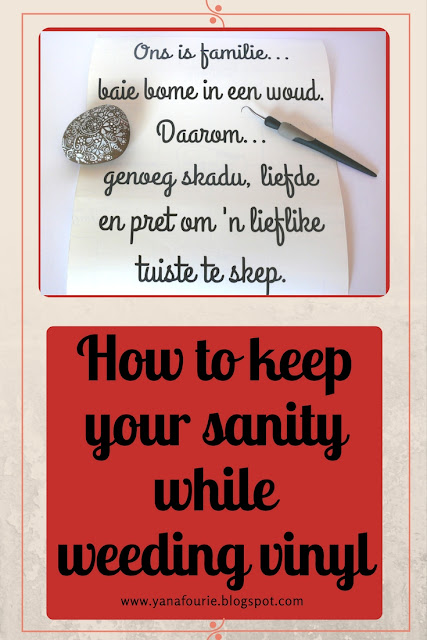
How to keep your sanity while weeding vinyl decals.

I think all of us had our hands in our hair some or other time when weeding vinyl. Surely I had! 
There is a little trick you can do in  Silhouette Studio V4 to make life or weeding for that matter just so much easier.
It is as simple as adding weeding lines and weeding boxes. This will take you a few minutes to do, but I promise you that it makes it in the end so easy and hassle free.

How to keep your sanity while weeding vinyl. Cameo Silhouette. Tutorial. Craft. Vinyl. Eccentric Eclectic Studio.

How to keep your sanity while weeding vinyl


Let's start! You ready?

Open up your Silhouette Studio V4
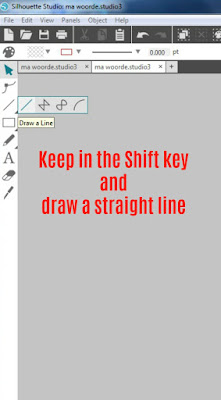
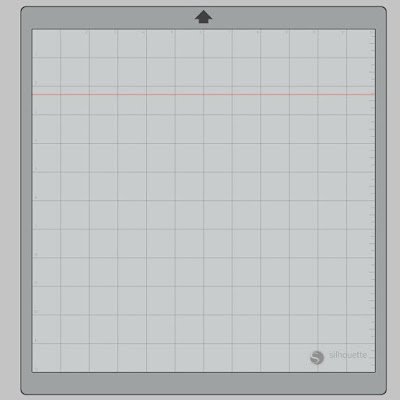
Keep the Shift key in and draw a horizontal line. By keeping in the Shift key it will keep the line straight.

Keep in the Shift key. Tutorial Step 1. Cameo Silhouette. Weeding lines. Vinyl

Keep in the Shift key


Draw a straight line. Tutorial Step 2. Cameo Silhouette. Weeding lines. Vinyl

Draw a straight line


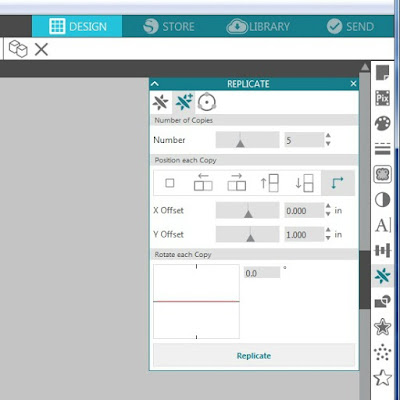
Open the Replica Window and choose the second button (the one looking like a flower with a +)
Choose the amount of copies you need.
You will see there is a button with two arrows to custom the position.
I choose X=0 and Y=1 inch.
Select the line - click on "Replica"

Replica. Tutorial Step 3. Cameo Silhouette. Weeding lines. Vinyl

Replica


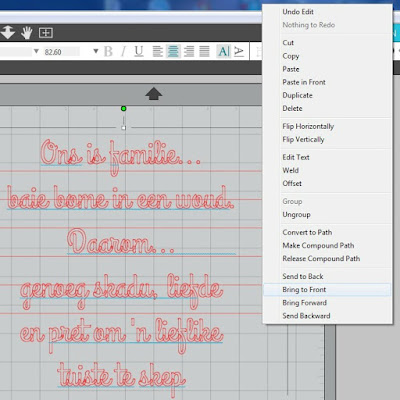
Open your design in front of the lines. You can right click on your design > Bring to Front.

Bring to front. Tutorial Step 4. Cameo Silhouette. Weeding lines. Vinyl

Bring to front


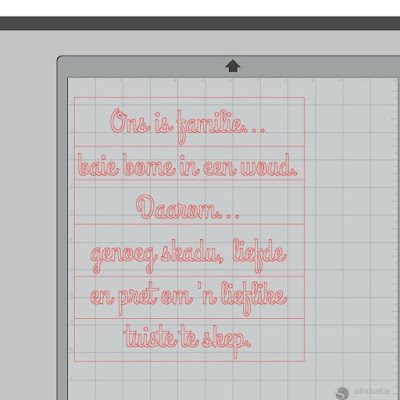
I draw a box around my design. This is my weeding box.
Adjust the lines that it fits into the weeding box. Space your lines by thinking of what will be the easiest to weed. Use your arrow key when you do the adjusting.

adjust weeding lines and weeding box. Tutorial Step 5. Cameo Silhouette. Weeding lines. Vinyl

Adjust weeding lines and weeding box


Select all the lines you want to cut.
Right click > Make Compound Path
Make sure you select/highlight your designs and the lines.

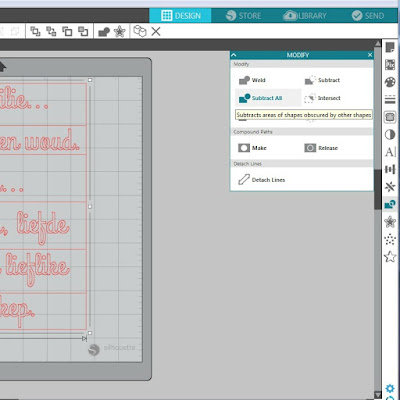
Open Modify Window > Subtract All

Substract. Tutorial Step 6. Cameo Silhouette. Weeding lines. Vinyl

Substract


By doing this you divide the vinyl in smaller parts to weed. No more worries of big pieces of vinyl that gets in the way and stick to each other when you weed.

Hope this was helpful.

Sunday, July 16, 2017

DIY Fridge Magnets

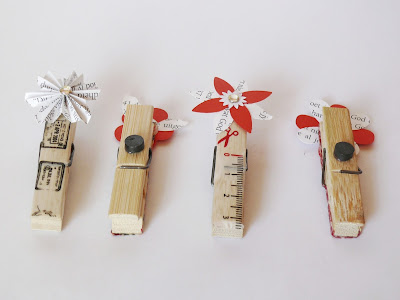
The idea of making fridge magnets of clothespins are all over Pinterest . Looking at them all inspired me to try and make my own fridge magnets.


DIY, Clothespins,  Magnets, Cameo Silhouette, Embellishments, Washi Tape, Eccentric Eclectic Studio, Craft,

DIY Clothespins Magnets


Most materials I had at home. What I love about this DIY and craft is that it won't cost you an arm and a leg. Materials  I used was:

Materials, Clothespins Magnets, DIY, Craft, Gel Medium, Washi Tape

Materials for DIY clothespins Magnets


I used four different washi tapes and secure it with gel medium. With my craft knife I just to clean up the small pieces that went over the edge of the clothespin. I put one more layer of gel medium on top of the washi tape. 

You can use any embellishments that you have. I made my own using my Silhouette Cameo and some shapes from the Silhouette Design Store. Rounding of the embellishments with some buttons and rhinestones.

DIY, Paper, Buttons, Rhinestones, Cameo Silhouette, Craft

Embellishments


Time to use my glue gun!
Glue the embellishments and small magnets on the clothespins.

Glue Gun, magnets, embellishments, craft, washi tape, clothespins

Glue the magnets and embellishments


And like everything else the final part is the packaging. My Cameo Silhouette came in very handy and I used the sketch pen. Finally just to brighten up the packaging some twine.

I love making it and will definitely make some more for gifts!


Monday, July 10, 2017

Eish! The struggle of heat transfer vinyl.

Eish! A South African word that is used to express surprise, annoyance, pain, etc.
Now that is how I felt using heat transfer vinyl (HTV)!

The materials I used was blue HTV vinyl, weeding tool (this is my lifesaver!), denim pencil case, and my favourite the Silhouette Cameo.

materials, pencil case, blue, HTV, heat transfer vinyl, weeding tool

Materials Used

It all started out easy doing a design on my laptop, using the Silhouette Cameo program and using  a design from Silhouette Design Store. (kitty cats.studio and design by Sophie Gallo)

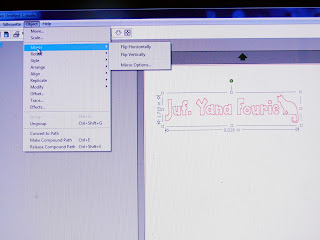
 Now the main thing to remember is to mirror your image before you cut it on your Silhouette Machine.


mirror image, HTV, Cameo Silhouette
Remember: Mirror your image!
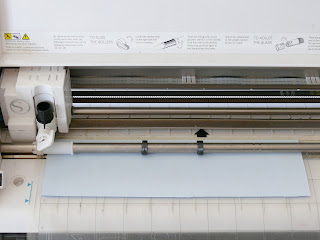
HTV is different from your normal vinyl and that is the reason almost don't see the cutting lines. The first time I thought that my machine didn't cut and went into a panic state. But don't fear, if you look closely and in good light you will see the cutting lines.


cutting lines, heat transfer vinyl, cameo silhouette,
Where is the cutting lines?

Now the next step is the weeding. You will need some patience and make sure you weed everything.  Not always easy, because I did struggle to see what should stay and what should go.


Weeding = Patience

Then came the big struggle... the ironing! Well, easier said than done. I just bought a new iron, nothing fancy. The iron let me down! First not enough heat and then it just doesn't wanted to warm up at all. Frustration and some cursing followed. The HTV just wasn't sticking and all the little parts moved around. Somehow the "u" got lost and the cat's tail folded in. Back to my Cameo Silhouette and cutting.


Last resort was to ask my neighbour to borrow her dry iron. And there was the magic -finally everything stuck!

The simple technique for HTV took so much longer. Didn't go as smooth as I planned. But what a great learning curve. I'm definitely more prepared what to expect with my next HTV project. 
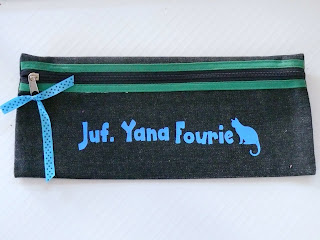
Heat transfer pencil case, Cameo Silhouette, DIY


All and all I'm happy with my pencil case for school ❤ Keeping all my stationery together for teaching. 

Would love to hear of your experiences with HTV.